Guide to Bridge Officer: Difference between revisions
| Line 31: | Line 31: | ||
This console is everything in ship combat. You can see your shields, your weapons systems, and the location of other ships in the system. Not all ships are hostile, but if you shoot at a neutral or friendly vessel, expect to start an intergalactic war. | This console is everything in ship combat. You can see your shields, your weapons systems, and the location of other ships in the system. Not all ships are hostile, but if you shoot at a neutral or friendly vessel, expect to start an intergalactic war. | ||
At the top of the screen you have your shield status and control. While the shields are up, they act as a physical barrier - if someone needs to throw something (such as an alien larva) outside the shields, they will be unable to without you lowering them. This also works for crew - salvage teams will not be able to bring things in or head out to salvage while the shields are up. An important note to make is that while the salvage team is outside the shields, ''they are not vulnerable to incoming fire and thus do not have to worry about being shot by the enemy.'' <!-- I'm not sure if it goes for outgoing fire. ---> | |||
When looking at enemy vessels, be sure to note their location. If they are not at the same planet/nav beacon you are, then you are out of range and your shots will do nothing. Also, when firing at enemy ships, you can select various subsystems to target. Damaging and destroying these hinder the enemy ships. Destroying the shields makes it so they cannot block your shots, destroying the engines reduces their evasion, etc. Also note that where you target determines the state of the salvageable wreck. If you shoot the bridge, the enemy will have difficulty evading. Use this strategically to salvage certain items (weapons, etc) for your ship! Note that it is a good idea to ask Captain where to fire and what to keep intact. | When looking at enemy vessels, be sure to note their location. If they are not at the same planet/nav beacon you are, then you are out of range and your shots will do nothing. Also, when firing at enemy ships, you can select various subsystems to target. Damaging and destroying these hinder the enemy ships. Destroying the shields makes it so they cannot block your shots, destroying the engines reduces their evasion, etc. Also note that where you target determines the state of the salvageable wreck. If you shoot the bridge, the enemy will have difficulty evading. Use this strategically to salvage certain items (weapons, etc) for your ship! Note that it is a good idea to ask Captain where to fire and what to keep intact. | ||
The weapon systems are sorted by type, with the MAC cannon(s) on top and the phase cannon(s) on bottom. Each phase cannon shot takes 200 energy and will fire almost as fast as you can click - be careful not to run it completely dry. A decent tactic is to use a couple of shots with the phase cannon to knock down the shields, then fire the MAC before their shield system recharges. | |||
===Crew Monitoring Console=== | ===Crew Monitoring Console=== | ||
Revision as of 21:56, 7 December 2016
Naturally the captain cannot press every single button on the bridge himself, so Centcom has employed multiple HIGHLY TRAINED OFFICERS to press the buttons for him. When you join you will be automatically assigned a station to man. However, this is not a formal assignment so you and the other officers may switch places at will. This may sound dull, but worry not, many fun things await you!
The Chain of Command
As a bridge officer you are not part of command staff like the Captain or HOP. You are on the same level as a standard department crewman, but you work on the bridge. Thus you must obey orders from all heads of staff, and your fancy uniform does not give you permission to order other people around.
In times of crisis the order of succession is Captain->HOP->Chief Engineer->Bridge Officer. The HoS cannot command both the ship and its security at the same time, and the CMO’s location is in Medical healing others. However, as a head of staff you should probably listen to them, but in the end you have authority over the bridge if the line of succession leads to you.
The Bridge Officers and the Munitions Officer are on the same level: none of them outrank another. While a Munitions Officer will generally take orders from the Weapons Officer about which rounds to load, they are not obliged to honor a request to, say, allow the WO into the munitions bay to get a toolbox.
Bridge Stations

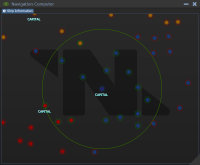
This console is how you move the ship to various locations. You can click on different circles on the map. Each circle represents a solar system, each with multiple celestial bodies. Different colors correspond to different factions. When you click on them it opens a menu where you can jump to the system and see more info. At the top you can click the "Show Map" tab to view the map of the current solar system. Clicking on planets lets you see if there are any points of interest. Additionally, if you can grab a copy of a local station's yellow-pages, it will help making finding nearby stations easier, as yellow-pages tell you where other nearby stations are. In combat you should stay near the computer in case you need to make a tactical retreat.
Remember: Inform the crew before you jump so they can get back on the ship or get busy things done such as moving prisoners or handling a supermatter shard delamination incident. If you make an unannounced jump and it causes someone's death (such as leaving a salvage team behind), you may face consequences both in-character (manslaughter charges) or out-of-character (job-bans).
The systems in the star map are colour-coded according to who controls them:
- Blue systems are friendly systems, controlled by Nanotrasen.
- Orange systems are neutral systems, and are controlled by the SolGov.
- Red systems are enemy systems, and are Syndicate-controlled
- White systems are not controlled by any one "faction", but tend to be infested with pirates.
- Every system has a small chance of containing pirates. Be on guard at all times!
On the planet map, you'll be able to see the type of planet each one is by clicking on them. Ringed planets have asteroids for miners to mine. Lava planets can be landed on, and Gas Giants are worthless (for now). Orbital Platforms are trading stations, where you can buy and sell things.
The Captain’s orders determine where you should be going, as well as the mission assignment. Your ship has a max range for jumps, so you need to plan the best route to travel to faraway locations; the FTL drive only has a limited supply of plasma to use and needs to recharge between jumps, so jumping more often than necessary can easily screw you over if you suddenly need to flee hostile forces.
Tactical Console

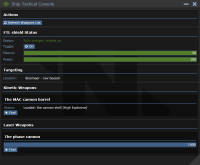
This console is everything in ship combat. You can see your shields, your weapons systems, and the location of other ships in the system. Not all ships are hostile, but if you shoot at a neutral or friendly vessel, expect to start an intergalactic war.
At the top of the screen you have your shield status and control. While the shields are up, they act as a physical barrier - if someone needs to throw something (such as an alien larva) outside the shields, they will be unable to without you lowering them. This also works for crew - salvage teams will not be able to bring things in or head out to salvage while the shields are up. An important note to make is that while the salvage team is outside the shields, they are not vulnerable to incoming fire and thus do not have to worry about being shot by the enemy.
When looking at enemy vessels, be sure to note their location. If they are not at the same planet/nav beacon you are, then you are out of range and your shots will do nothing. Also, when firing at enemy ships, you can select various subsystems to target. Damaging and destroying these hinder the enemy ships. Destroying the shields makes it so they cannot block your shots, destroying the engines reduces their evasion, etc. Also note that where you target determines the state of the salvageable wreck. If you shoot the bridge, the enemy will have difficulty evading. Use this strategically to salvage certain items (weapons, etc) for your ship! Note that it is a good idea to ask Captain where to fire and what to keep intact.
The weapon systems are sorted by type, with the MAC cannon(s) on top and the phase cannon(s) on bottom. Each phase cannon shot takes 200 energy and will fire almost as fast as you can click - be careful not to run it completely dry. A decent tactic is to use a couple of shots with the phase cannon to knock down the shields, then fire the MAC before their shield system recharges.
Crew Monitoring Console
Exactly the same as the one is medical. Its uses are limited except for shouting at people whose suit sensors are disabled. Use this console to coordinate medical staff during a battle. You can expect the Chief Medical Officer to be manning this station.
Engineering Console
Used to monitor power usage and generation. Expect this to heavily change after the power revamp. Chief Engineer may man this position.
Security Console
If the HOS wants to be on the bridge, he will probably use this one.
I am bored. What now?
When you are in FTL or waiting on miners to mine ores, things can get boring. Here are a few ideas on how to stay busy during the lulls in action.
- Shout at people to activate suit sensors.
- Shout at Research to upgrade the phase cannon.
- Shout at Engineering to increase power output/fix the engine core.
- Have the Chef bring you some food to eat.
- Have the Bartender bring everyone drinks and get super drunk.
- Find station pets and sacrifice them to the gods of war. The gods might appreciate this.
- If you have done everything on this list, then shout at the people outside to hurry up and prepare for departure.
- Repeat.