Munitions Officer: Difference between revisions
m (Added Department SOP as a guide) |
LordWalnut (talk | contribs) No edit summary |
||
| Line 1: | Line 1: | ||
{{needs revision|reason=Outdated/borked image}} | |||
{{JobPageHeader | {{JobPageHeader | ||
|headerbgcolor = gray | |headerbgcolor = gray | ||
Latest revision as of 15:30, 7 April 2018

|
This page needs revising!
The following page is out of date and/or needs to be revised. If the page's guide needs revision, see here for an example. |
| SUPPLY STAFF | |
  Munitions Officer |
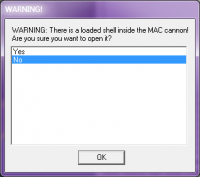
Access: Delivery Office, Munitions, MO office, Outer Bridge, Bridge Additional Access: N/A Difficulty: Easy Supervisors: Head of Personnel Duties: Load the mac cannon Guides: Guide to munitions, Munitions, Department Standard Operating Procedure Quote: "WARNING: There is a loaded shell inside the MAC cannon! Are you sure you want to open it? >Yes" |
You are the Munitions Officer. You wanted to fire the MAC cannon, but the Weapons Officer position was already taken. Or maybe you actually wanted to load the MAC cannon. Whatever the reason, you're in charge of the main arm of the NSV Astraeus's anti-ship battery, the Mass Accelerator Cannon cannon.
ROLE RULES:
- DO NOT EJECT AN ARMED SHELL FROM THE MAC. IT WILL EXPLODE. This is griefing.
- Listen to your Weapons Officer regarding what shell to load in the MAC. They know more about the situation than you do
- Do not let anyone into Munitions without good reason. You will be held responsible if anything bad happens.
Bare minimum requirements: Load the MAC cannon without blowing yourself or Munitions up.
Lock and load.

The MAC cannon is your responsibility, so it's probably best to start off with a quick how-to guide to loading it:
- Open the MAC cannon's breech. (If you get a pop-up warning like the one shown to the right, there is a live round already loaded and you do not want to unload it.)
- Use the munitions console in the office and select a round.
- Turn on the conveyor belt and wait for the round to move itself onto the loading tray.
- Use a multitool on the round to toggle the arming mechanism. If the lights are flashing, the round is armed. You can disarm a round if it's outside the MAC cannon by using a multitool again.
- Close the MAC cannon's breech.
Congratulations, the MAC is now loaded. Once there is an armed shell in the MAC, you've passed the point of no return - you cannot unload it without it detonating.
Your Chain of Command
As a Munitions Officer, your chain of command is slightly odd: While your immediate superior is the Executive Officer, you're most likely going to be taking orders from the Weapons Officer or the Captain. You and the Weapons Officer are at the same level on the Chain of Command - neither one of you outranks the other.
It's a good idea to listen to them when they tell you what type of ammo to load because they're better-equipped to make informed decisions about what ammo would be most effective, but if they ask for you to allow them into the Munitions Bay, for example, you are not required to honor that request. If in doubt, ask the Head of Personnel for advice.
Give me another HE!
There are three different types of ammunition you'll be using, each listed here:
Your WO should either tell you what to load, or come up with a battle plan with you before the shells start flying. If they don't, nag them until they tell you which shell you need - using a shield piercing round against a target with no shields, for example, is a waste of ammunition - and you only get 5 of each to start with!
Tips
- Enemy shields are usually taken out quickly with the phase cannons, granting a pathway for an HE round. You'll want to load HE unless told not to.
- The MAC cannon is loud. If you don't have a bowmans' headset, there are earmuffs in the office.
- Wearing a bombsuit, found in the Level 4 EOD closet in the office, will mean if you get hit with an explosion or eject a live round into yourself, you won't be gibbed and can thus be cloned.
- You have a baton. Use it if there are intruders.
- Ejecting a live shell is a surefire way to get lynched at best and banned at worst.
- The MAC breech can hold 1,000 (one THOUSAND) units of oil. It comes loaded with 50 at roundstart. It's a good idea to get some more as soon as possible.
| Jobs on FTL13 | |
| Command | Captain, Executive Officer, Bridge Officer |
| Security | Head of Security, Security Officer, Master-at-Arms, Detective |
| Engineering | Chief Engineer, Ship Engineer, Atmospheric Technician |
| Supply | Quartermaster, Cargo Technician, Shaft Miner, Munitions Officer |
| Science | Research Director, Scientist, Roboticist |
| Medical | Chief Medical Officer, Medical Doctor, Chemist, Geneticist, Virologist |
| Service | Janitor, Bartender, Cook, Botanist, Clown, Mime |
| Civilian | Assistant, Lawyer, Chaplain, Librarian |
| Non-human | AI, Cyborg, Positronic Brain, Drone, Personal AI, Construct, Adamantine Golem, Ghost |
| Antagonists | Traitor, Changeling, Nuclear Operative, Wizard, Shadowling, Abductor, Xenomorph, Revenant, Space Ninja, Holoparasite, Swarmers, Blob, Devil, Clockwork Cult |
| Special | Centcom Official, Death Squad Officer, Emergency Response Officer, Ian |
| Races | Humans, Lizardperson, Flyperson, Plasmaman, Podman, Miscellaneous |
