Guide to munitions
Congratulations, Recruit! You have been inducted into the honored group of MAC operators. This guide will tell you everything you need to know about your weapon, how to maintain it, and how to operate it in the heat of battle.
Overview
The Mass Accelerator Cannon, Caliber 1400mm, KH179, was originally developed for the Astraeus class of Cruisers near the start of the Wizard War, the KH179 has served as the primary heavy weapons system of the fleet for decades. Celebrated for its reliability, the KH179 is chambered for the 1400x2000 MAC round. By harnessing focused gravitic fields, similar to those made by artificial gravity generators, the KH179 forms the first stage of a two stage weapon system. These gravitic coils accelerate the round out of the ship to a safe distance where the onboard rocket motor performs terminal acceleration and guidance. A variety of ammunition is available, with differing capabilities depending on the round.

Legend
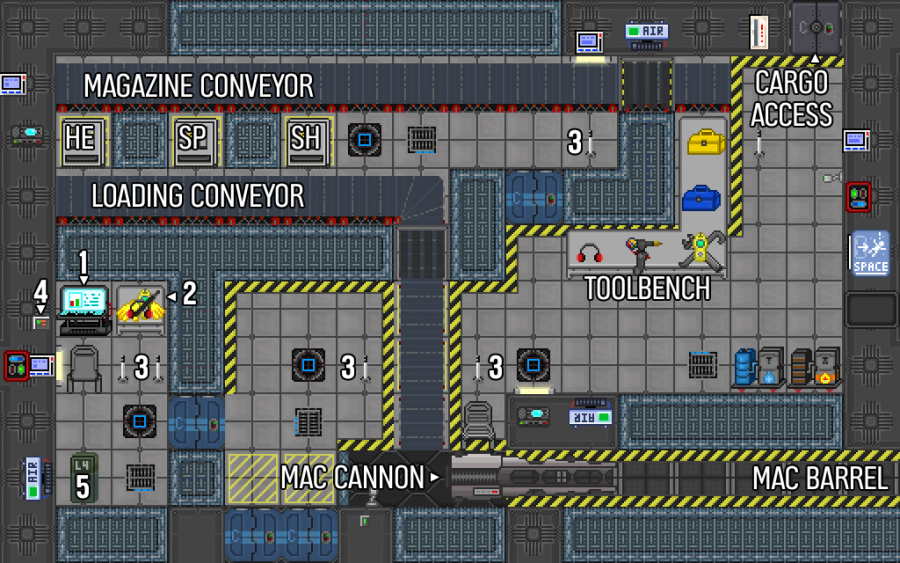
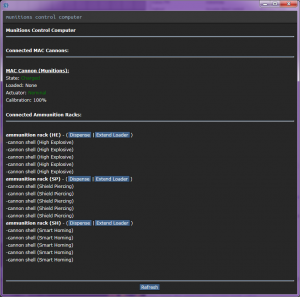
- Munitions Control Computer: This is where you check the status of the MAC, or pull a shell off the ammo rack. You can extend the loader arm for each rack here, which will open the loader to the magazine conveyor, or you can alternatively click on the ammo racks themselves.
- Telescopic Baton: You have one of these to remove greytiders from your Munitions Bay. If someone is being a nuisance, don't be afraid to use it and throw them out into the hall: It's better to use it and have one person hate you than it is to have someone open the loaded MAC and have the entire crew hate you.
- Conveyor Switches: These control the loading and magazine conveyors.
- Blast Door Control: This opens and closes the blast doors. Every window visible in the image above, as well as the two doors at the bottom and the door at top right, has a blast door that can be closed by pressing this button. (The window at the very bottom right, however, is on a separate control and is closed by the Bridge crew.)
- Bombsuit Locker: This locker contains one bombsuit, which you'll want to wear: If a shell detonates in your face while wearing one of these heavy duty suits, you will not be gibbed - this means you can be cloned and go back in for more action.
Not shown: There is a conveyor from cargo to munitions to allow the cargo techs to send ammo there.
Munitions Quick Start Guide
At round start there is not much you need to do. In battle, however, you are one of the most important members of the crew. Here is a list of your responsibilities:
- Load the MAC Cannon in battle
- Coordinate ammo supply levels with the cargo department.
- Keep idiots out of the Munitions Bay. The only people that should be allowed into the Munitions Bay are the Captain, XO and HoS.
You have a Command Headset. Spamming with it will only get it taken away. It is to be used to coordinate battle plans and ammo statuses with the Captain and Weapons Bridge Officer. Be sure to ask what type of ammo to load, and report when ammunition is running low.
In Battle
The KH179 consists of three main components: The breech assembly, the actuator housing, and the guidance rails, or barrel.
Firing procedure for the cannon is as follows:
- Open the breech by clicking on it. For ease of reloading, the weapon is equipped with a rapid ejection system that expels the expended casing, or anything else in the chamber, at speed. Care must be taken that no personnel or equipment are behind the breech at the time of shell ejection.
- Use the Munitions Control Computer to dispense a round of the desired ammo type from the hardened storage bunkers. The conveyor belt system can then be used to move the round into loading position. In case of power failure, shells can be manually dispensed.
- Once the shell is in position on the loading tray, arm it with a standard issue multitool. If necessary, the round can be disarmed in a similar manner. WARNING: At this time, there is no procedure to downcycle an armed round from the weapon. Ejecting an armed projectile will result in the activation of the proximity fuse, and detonation.
- After the cannon is fired from the bridge, open the breech and eject the shell, before repeating the loading process.
When in battle against a power adversary, you should try to alternate between shell types. This means you will not run out of ammo super quickly, and that you have a mix of effects when you shoot. The exception to this rule is to not use up all of your Shield Piercing ammo by firing them while their shield generator is destroyed. They do lower damage and are best fired as a first shot to drop their shields.
Ammo Types
Currently, three types of ammunition are standard issue on NT vessels. A 1400x2000mm round consists of two parts: The projectile itself, containing warhead, guidance package, and rocket motor, and the casing, which acts as a hardened storage tank for the hydrazine monopropellant fuel. This casing is discarded upon firing.
Maintenance

To maintain optimum combat readiness, the KH179 requires regular maintenance. There are three main issues reported:
Jamming
The weapon's breech assembly contains an internal lubricant reservoir, capacity 1000u. You can examine the breech to view the current oil level. This should be kept filled with standard machine oil , obtainable from your ship's chemistry department. Failure to do so will result in a breech jam, and loading will not be possible.
Miscalibration
As the weapon fires, the gravitic shear slowly pulls the acceleration coils out of alignment. If the coils drift too far out of alignment, shell explosion in the gun can result. These coils have a limited lifespan, and must be recalibrated regularly.
To recalibrate, you'll need to remove the actuator. This is fairly simple to do:
- Unscrew the MAC breech's maintenance panel.
- Multitool the actuator inside of the MAC cannon to reset the calibration.
- Screw down the MAC breech's maintenance panel.
The recalibration procedure has a chance to burn out the actuator. To replace an actuator, see the procedure below:
Actuator Burnout
In case of Actuator Burnout, the Munitions Control Computer will display the error, as well as sending an alert to bridge staff.
Actuator Replacement:
- Acquire a replacement actuator. You can get one from the autolathe at Cargo for 4000 metal and 4000 glass, under the 'Misc' section.
- Unscrew the MAC breech's maintenance panel.
- Pry out the actuator.
- Move the old actuator so it does not cause the MAC issues later. It should be under the breech.
- Insert the replacement actuator.
- Screw the MAC breech's maintenance panel closed.
Clown
The clown is in your workspace, for some reason.
Disposal:
- Take out your baton.
- Dispense beatings.
- Once the clown has been incapacitated, load it into the MAC.
- Fire the clown into space.
Tips and Warnings

- Opening the breech with an armed shell inside will cause it to fly across the room and detonate. Doing so will almost certainly lead to a job ban.
- Loading more than one thing in the MAC cannon at a time may result in an in-breech explosion. Mind those shell casings!
- Queuing up multiple rounds on the conveyor can speed up the reloading process.
- Starting off with a Shield Piercing round, then using a mix of HE and SM is a good combat mix.
- Inform the chain of command when ammo is running low. You can purchase more from stations, but the captain needs to know when you are running out so he can be mindful of entering combat.
- Keep other crew members out of the Munitions Room. They will either mess things up or accidentally (or intentionally) eject an armed shell from the cannon and ruin everything. You have a baton, use it!
- Make sure the Quartermaster knows to order more shells when docked at a station.
- You can open the Ammo Racks by clicking on them, as well as through the Munitions Control Computer.
- If you have to go AFK or leave the round, let somebody know either IC or OOC, so somebody can take your place.