Guide to Bridge Officer

Naturally the captain cannot press every single button on the bridge himself, so Centcom has employed multiple HIGHLY TRAINED OFFICERS to press the buttons for him. When you join you will be automatically assigned a station to man. However, this is not a formal assignment so you and the other officers may switch places at will. This may sound dull, but worry not, many fun things await you!
The Chain of Command
As a bridge officer you are not a head of staff like the Captain or Head of Personnel. You are on the same level as a standard department crewman; the only difference between you and a standard crewman is your department is the bridge. Thus you must obey orders from all heads of staff, and your fancy uniform does not give you permission to order other people around.
In times of crisis the order of succession is Captain → Head of Personnel → Other Heads → Helms Officer. Being on the bridge does not give you special privileges to jump the chain of command, although the Chief Medical Officer may opt to pass and stay in medbay to heal others, the Chief Engineer may opt to stay with their team and coordinate repairs, and the Head of Security may opt to stay with and coordinate the Sec team.
The Bridge Officers and the Munitions Officer are on the same level: none of them outrank another. While a Munitions Officer will generally take orders from the Weapons Officer about which rounds to load, they are not obliged to honor a request to, say, allow the WO into the munitions bay to get a toolbox.
Your Duties
Your duties will vary depending on whether you're a Helms Officer or a Weapons Officer. While these aren't formal assignments, and the HO and WO can switch places as will, you should not touch the other bridge officer's console unless the other bridge officer is MIA or you've been cleared to do so by the other BO or the Captain. If you do end up using the other BO's console, you assume full responsibility for what effects your actions may have.
Helms Officer
As a Helms Officer, your duties are fairly relaxed. Your main responsibility is to jump the ship from point A to point B. The Captain’s orders determine where you should be going, as well as the mission assignment. Your ship has a max range for jumps, so you need to plan the best route to travel to faraway locations; the FTL drive only has a limited supply of plasma to use and needs to recharge between jumps, so jumping more often than necessary can easily screw you over if you suddenly need to flee hostile forces.
Of course, jumping into enemy space also opens up the option to salvage more things, such as more phase cannons, air or plasma tanks, or other miscellaneous bits and bobs of cargo. You should consult with the Captain whether or not you should take the direct way or make a few stops in Syndie space, as well as the Weapons Officer to see if you have the capabilities to take on the extra enemies that you wouldn't have to worry about otherwise.
Remember to warn the crew before you jump, you might regret jumping unannounced.
Weapons Officer
As a Weapons Officer, your job is a bit more logistically involved than that of a Helms Officer. You're in charge of firing the onboard anti-ship battery, so you need to coordinate with the Munitions Officer on what to load, the Captain on where to aim, and the salvage team on when to bring the shields down and up.
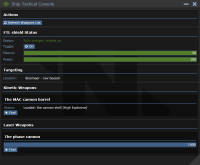
Targeting an enemy is as simple as clicking the vessel's name under the Targeting section of the Tactical Console, and selecting where you wish to aim on the ship. A small reminder of where you currently are is listed at the top of the targeting section - remember, the NSV Astraeus' anti-ship battery can only hit ships at the same planet you're at, so aiming at one at the navbeacon while you're at a planet will only waste ammo. The available salvage from a ship will depend on where you aim. Shooting at the hull will destroy the cargo holds, shooting at the weapons will reduce your odds of salvaging a tenth phase cannon for your ship. Pick your targeting location carefully.
The phase cannons are designed to disrupt the enemy ships' shields for long enough to get a MAC round through them. All of your MAC shells (shield-piercing excepted) will explode harmlessly on enemy shields, so it's a good idea to fire a short burst of 2 or 3 shots from the phase cannon, then fire a MAC at the shield generator.
Bridge Stations
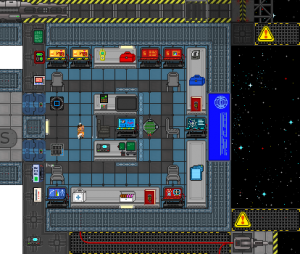
There are six stations on the Bridge, but in general you're only going to use two (and MAYBE the communications console to announce a jump).

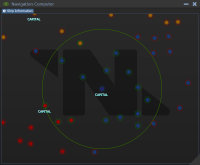
This console is how you move the ship to various locations. You can click on different circles on the map. Each circle represents a solar system, each with multiple celestial bodies. Different colors correspond to different factions. When you click on them it opens a menu where you can jump to the system and see more info. At the top you can click the "Show Map" tab to view the map of the current solar system. Clicking on planets lets you see if there are any points of interest. Additionally, if you can grab a copy of a local station's yellow-pages, it will help making finding nearby stations easier, as yellow-pages tell you where other nearby stations are. In combat you should stay near the computer in case you need to make a tactical retreat.
Remember: Inform the crew before you jump so they can get back on the ship or get busy things done such as moving prisoners or handling a supermatter shard delamination incident. If you make an unannounced jump and it causes someone's death (such as leaving a salvage team behind), you may face consequences both in-character (manslaughter charges) or out-of-character (job-bans).
The systems in the star map are colour-coded according to who controls them:
- Blue systems are friendly systems, controlled by Nanotrasen.
- Orange systems are neutral systems, and are controlled by the SolGov.
- Red systems are enemy systems, and are Syndicate-controlled
- White systems are not controlled by any one "faction", but tend to be infested with pirates.
- Every system has a small chance of containing pirates. Be on guard at all times!
On the planet map, you'll be able to see the type of planet each one is by clicking on them. Ringed planets have asteroids for miners to mine. Lava planets can be landed on, and Gas Giants are worthless (for now). Orbital Platforms are trading stations, where you can buy and sell things.
Tactical Console

This console is everything in ship combat. You can see your shields, your weapons systems, and the location of other ships in the system. Not all ships are hostile, but if you shoot at a neutral or friendly vessel, expect to start an intergalactic war.
At the top of the screen you have your shield status and control. While the shields are up, they act as a physical barrier - if someone needs to throw something (such as an alien larva) outside the shields, they will be unable to without you lowering them. This also works for crew - salvage teams will not be able to bring things in or head out to salvage while the shields are up. An important note to make is that while the salvage team is outside the shields, they are not vulnerable to incoming fire and thus do not have to worry about being shot by the enemy.
When looking at enemy vessels, be sure to note their location. If they are not at the same planet/nav beacon you are, then you are out of range and your shots will do nothing. Also, when firing at enemy ships, you can select various subsystems to target. Damaging and destroying these hinder the enemy ships. Destroying the shields makes it so they cannot block your shots, destroying the engines reduces their evasion, etc. If you shoot the bridge, the enemy will have difficulty evading. Shooting at the hull will destroy the enemies' cargo holds. Where you target determines the state of the salvageable wreck. Use this strategically to salvage certain items (weapons, etc) for your ship!
The weapon systems are sorted by type, with the MAC cannon(s) on top and the phase cannon(s) on bottom. Each phase cannon shot takes 200 energy and will fire almost as fast as you can click - be careful not to run it completely dry. A decent tactic is to use a couple of shots with the phase cannon to knock down the shields, then fire the MAC before their shield system recharges.
Crew Monitoring Console
If the Chief Medical Officer wishes to be on the bridge, they'll most likely be manning this console. Functionally, it is identical to the crew monitoring console in their office. You could use this to coordinate with the mining team to recover a deceased miner if you wish, or ensure everyone's back aboard before making the takeoff announcement. Or, if you're bored and there's a lull in the action, you could see who's where and take guesses as to what they're up to.
Engineering Console
If the Chief Engineer wishes to be on the bridge, they'll most likely be here watching the power. Functionally, the consoles are identical to the two in the engine bay. The console on the left can be used to monitor power draw and generation, and the console on the right can be used to transfer power from one area to another. You could monitor it from the bridge and see when engineering finally sets the SMES units, or nag at them to increase the power output if the power draw is close to or exceeding the available power.
Security Console
If the Head of Security isn't up to their knees in dead detainees and wants to be on the bridge, they'll most likely be manning this console. These consoles are identical to the two in their office and two of the three at the dispatchers' area of the Security Offices - the one on the left is the recordkeeping console, the one on the right is the cameras. You won't be able to access the records unless the Head of Security forgets to log out, but you can look through the cameras and see yourself looking at the cameras, or see if the Supermatter shard is on fire and then yell at Engineering before the SM shard does.
Communications Console
The Communications Console is similar to the ones found aboard modern stations, albeit with some differences. The Captain will usually be manning this station. He will usually leave the console unlocked, so you can use this to ask Centcomm for guidance in an emergency , check your objectives, or make an announcement regarding jumps. Expect the Captain to be rather cross with you if you use it while he's present, however.
Miscellaneous Tips and Tricks
- Helms/Weapons Officer is an informal assignment - you are free to switch with the other Bridge Officer at will.
Helms
- You will only be able to see if a planet has a station if you're orbiting it.
- Obtaining a station's yellowpages will help you locate nearby stations, as well as see their stock and pricing.
- If Centcomm is feeling generous, they may respond to you if you ask where a station is.
- Coordinate closely with Engineering.
- They are in charge of the FTL/shield plasma. You cannot jump without power or plasma. Jumping into enemy territory before the FTL plasma is connected can and will easily cause mass casualties.
- They are also in charge of the engine. Extended planetside stays play hell on the cold loop's ability to cool the engine. If you stay down there too long and Engineering isn't prepared for it, you could cause the Supermatter to delaminate - and you can't readily eject the Supermatter planetside, as it'll destroy the enginebay.
- They also need your help - you cannot safely eject the Supermatter when docked at a station or planetside. In the case of the former, it will bounce off the docking wall; the latter, the atmosphere will allow it to damage the enginebay if it explodes.
- There is no shame in retreating if you're outnumbered. Sometimes it's better to retreat, regroup, and try again than it is to stay in the fight and continuously take hits.
Weapons
- If you accidentally fire upon Nanotrasen, ahelp it immediately - it is impossible to get Nanotrasen to stop firing upon you without admin intervention.
- Like with the Helms Officer, coordinate closely with Engineering.
- They can set up cannons you salvage from combat. Get enough and you can take down ships easily without having to fire the MAC.
- They are in charge of the FTL/shield plasma. If the shield plasma is unwrenched, you only get one hit to the shields before you're exposed to incoming fire.
- They also need your help - in the event they need to jettison the Supermatter, you will need to lower the shields so the Supermatter Shard doesn't bounce off them and go back in.
- Due to a bug in spriting, unscrewing the maintenance panel of the phase cannons or loading an unarmed round in the MAC will cause its sprite to disappear. Ensure Engineering and Munitions are aware of this. (The in-character excuse for this is 'due to a glitch in the firmware, doing either will engage their stealth systems'.)
- Phase cannons can be upgraded with better batteries to be able to store more charge. However, you need a Bluespace RPED to do so (see above bullet).